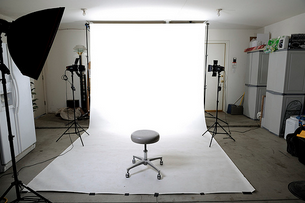
1. Whatever drives you to pursue your interest in digital photography, it will eventually cause you to think about having a studio in your home. Before you take the plunge, however, make sure you’re confident and serious about making the investment in money and time to use a home studio. No one can predict the future, but you might want to explore many of the other common types of photography (landscapes, nature, sports, architecture, street life, etc.), in case one of these suddenly fires your imagination more than working in a studio much of the time. Learn more about home photography on our website PhotographyTalk.com.

3. When it comes time to scratch that inch, you must have a plan before you start ordering equipment and moving one of your children from his or her bedroom to the basement, so you can commandeer the bedroom for a studio.
4. The location of your studio is the first factor to consider. You want it to be where you can leave equipment on the floor without having to pack it every time you finish a shoot. For that reason, it must be in a space in the basement or attic that doesn’t disrupt family life, but it should also be behind a closed, locked door, so children can’t enter and injury themselves.
5. It must also be an area of your home where you can erect a temporary structure for backdrops or to hang lights from the ceiling level.
6. It’s also important that your home studio is well ventilated, since studio lights generate plenty of heat very quickly.
7. Once you’ve decided on the location for your home studio (and your spouse or significant other agrees), you must next plan the layout of the studio. You want to use the longest dimension of the room, so you have more shooting options of your subject. Plan on finding some coverings to block any sunlight entering the windows.
8. You’ll then want to construct that temporary structure, so you can install a seamless white background that creates an “infinity” drop, which simply means that the background is one piece that hangs from and covers the back wall, and then spreads across the floor. A large white sheet will work just fine.
An alternative to building a frame for a backdrop is to purchase a backdrop kit, such as the Photoflex FirstStudio Backdrop Support Kit. It sells for $149.95 at B&H Photo Video.
It’s easy to drape a white sheet over the Photoflex frame or purchase studio-specific roll paper, so you’ll always have a fresh, clean background for each shoot.
9. Include a small stool, as part of your studio equipment. What the pros do is to place the stool where your subjects will sit under or behind the backdrop, so it’s not seen in your portrait photos.
10. Now that you know what kind of photography you will shoot in your home studio, where it will be located and how you plan to use the space, you can finally decide on the appropriate lighting package. Since this will be your first foray into the studio experience, you want to be budget-conscious and start with a basic kit.
11. An excellent choice is the FirstStudio Three-Light Portrait Kit from Photoflex. It includes 3 FirstStar light heads, 3 FirstStar 250-watt lamps, 3 45-degree silver umbrellas and 3 Photoflex LiteStands. This Photoflex FirstStudio Kit is available from B&H Photo Video for $379.50.
12. Once you have your Photoflex FirstStudio Kit, you can learn the three-point lighting concept and many other lighting techniques at the free online PhotoflexLightingSchool. You’ll find it at www.photoflexlightingschool.com/.
Your feedback is important to thousands of PhotographyTalk.com fans and us. If this article is helpful, then please click the Like and Re-Tweet buttons at the top left of this article.
This article about the topic "12 Tips To Create a Photographer’s First Home Studio" was first published on our website here https://www.photographytalk.com/photography-articles/1801-12-tips-to-create-a-photographers-first-home-studio